|
Safari Tips
____________________
How to Remove Widgets from the Dashboard.
If you've downloaded and installed additional widgets in Dashboard, you can later remove them.
- Open Dashboard, then click the Open (+) button to reveal the widget bar.
- Click Manage Widgets to open the Widgets Dashboard widget.
Widgets that can be removed have a red Remove (-) button after their names.
- Click the Remove (-) button to remove the widget.
- Click OK to confirm that you want to move the widget to the Trash.
You cannot remove the standard Mac OS X widgets that come with Dashboard, only widgets that you've added.
Summarize - OS X Overlooked Feature
Source: TechPwn
One of the most hidden, yet very valuable features in Mac OS X is “Summarize”. It is a very self-explanatory feature that can be found in the services menu, which is itself a very underused part of OS X. What it does is it takes an selection of text and generates a very precise summary of the text. Here is how to use summarize…
1. Open the program that holds the text you would like to summarize (it doesn’t work on some programs, it works best on Mac programs like Safari, etc., but read below for a tip on how to make it work with any text)
2. Highlight the text that you want to summarize and click the program name you are using in the menu bar.
3. Navigate down to the services selection, and in there you will find “Summarize”.
4. After you click it, a window will instantly pop open with your summary in there. There are a few customizable options such as going from sentences to paragraphs, but it is pretty simple.
This is an awesome feature if you want to read a long article but don’t have a ton of time. It is also a great feature and tool for students who have long online reading assignments. It is amazing how accurate this summary actually is. It uses popular keywords and phrases to put the summaries together.
Tip: If the application you are using doesn’t support services, all you have to do is copy the text into a TextEdit (if you never use this, just search for it in Spotlight) document and then summarize it.
Works great on long news articles!
Searching Just Your Bookmarks
If you’re trying to search for a particular bookmark, you’ll want to know this trick: First, click on the Show All Bookmarks icon in the top-left corner of the Bookmarks Bar. Doing this makes the Collections column visible on the left side of Safari, but more importantly, it adds a Search field at the bottom center of the Safari window. When you type search terms in this field, it searches just within your bookmarks, so you get super-fast results. Source: Apple.com
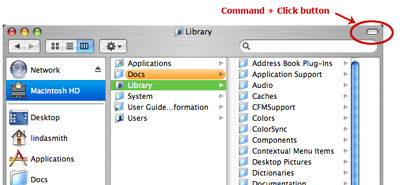
Change the Look of Your Toolbars
Command-click window toolbar button (upper right corner) to cycle through 6 different looks.
How to Change the Look of Your Folders and Files with Icons
 There are all kinds of colorful, fun looking icons out there for you to customize your Mac with. Any folder or file can be changed easily with the instructions below. There are all kinds of colorful, fun looking icons out there for you to customize your Mac with. Any folder or file can be changed easily with the instructions below.
- Select a file or folder with the icon you want to use.
- Press Command-I to bring up the Inspector panel.
- Click on the icon in the upper left corner of the Inspector panel (a border should appear around the icon.)
- Press Command-C to copy the icon.
- Select the file or folder that you want to customize.
- Press Command-I to bring up the Inspector panel. Again click on the icon in the upper left corner of the panel.
- Press Command-V to paste the icon. Close both Inspector panels.
Need icons to customize your Mac? Check out the links below:
www.apple.com/downloads/macosx/icons_screensavers/
interfacelift.com/icons-mac/
www.iconfactory.com/
www.pixelgirlpresents.com/
Revert Back to the Original Icon
If you don’t like the icon you just applied you can easily revert back to the original.
Open the Inspector window for the icon you want to remove. Click on the icon
so that it has a border around it. Select 'Cut' from the Edit
menu (press command-x). The icon will revert to its original form.
______________________ Modifier Keys
If you sometimes hit the CAPS LOCK key while typing and
you do not notice it right away, you might have to retype
a line or two. This is seldom much fun. However, there
is a way in OS X Tiger to prevent this from ever happening.
Just open System Preferences and select the Keyboard & Mouse
pane. Click on the Keyboard tab and then the Modifier Keys
button. Here you can reset the Caps Lock key to have "no
action" and you can also reset the Control, Option,
and Command keys to behave as you want. If you are using
a Services-aware application, the Convert service can perform
a number of useful modifications to typed text.
Tip sent in by Gary Brandt.
______________________ Tips and Tricks for iLife
From Kibbles & Bytes Newsletter #407, March 25, 2005
www.smalldog.com
I love searching the Internet for new tricks. Here are tips
and tricks
web sites for each of the iLife applications.
iPhoto
digitalphotography.weblogsinc.com/
www.mactipsandtricks.com/tips/
www.storyphoto.com/digital_photo/iphoto_tips
www.vigay.com/support/iphoto.html
iMovie
mac.oreilly.com/news/imovietips
www.danslagle.com/mac/iMovie/
iDVD
http://www.philafcpug.org/mt/archives/000290.html
http://raven.ubalt.edu/departments/corpCom/labMan/iDVD/tips.html
iTunes
www.apple.com/itunes/hottips/
www.cynics.info/journal/2003/05/itunes_tips_gripes_and_tidbits
yabb.jriver.com/interact/index.php
www.plasticbag.org/archives/448.xml
www.isaack.info/archives/2004/02/18/itunes-tips/
GarageBand
www.synthtopia.com/Articles/GaragebandTips.html
www.macidol.com/tips.php
www.stargeek.com/item/64512.html
www.gaslo.com/journal/2005/03/07/garageband-recording-tips/
______________________
Burn Sessions on a CDR Without Extra Software.
by Troy Kingsbury (Troy@smalldog.com)
I just discovered a way to burn a
CD-R on your 10.3 OS-installed computer using the Disk Utility.
Before I discovered this, the only way
that I knew to complete this function was to use third-party
software
such as Roxio Toast. I found this while surfing around the
Apple
Knowledge Base last night.
http://docs.info.apple.com/article.html?artnum=160588
Here are the steps:
1. Create a folder for the session
and drag the items you want to burn
into the folder.
2. Open Disk Utility, located in Applications/Utilities.
3. Select Images > New > "Image from Folder." Then
select the folder
you created in the navigation window and click Open.
4. Type a name for the image, choose a disk format (I used
Read Only),
and click Save.
5. When the disk image is complete, select it in the left
column of the
Disk Utility window.
6. Choose Images > Burn or click Burn in the tool bar.
7. Insert a blank CD in the optical drive.
8. Select the "Leave disc appendable" check box.
If you don't see this
option, click the triangle in the top-right corner to see
this option.
9. Click Burn.
Now to add to the disc later, follow the steps above to
create a new
disc image and burn it to the disc.
I do not know how many times that I have burnt a disk for
just a little
file because I do not have Toast installed on my computer.
Now I should
be able to conserve just a little bit more on the disks that
I use, and
hopefully you can, too!
______________________
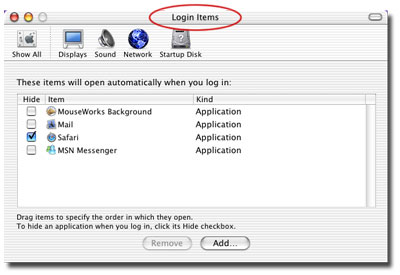
Automatically
Open Your Favorite Apps or Documents
When You Login
Setting up a User's Login
-
In Login Items, any user (including
yourself) can choose to have certain
items automatically open during
the login process. You can have
your favorite applications open,
or utilities, documents, even
movies or music. If you choose
to have a document open, the application
it was crated in will have to
open, as well, even if you don't
have it in the list.
-
The files will open in the order
they are listed. Drag any file
in the list up or down to change
the order.
-
If you don't want to see a certain
application right away, click
in the box to hide it. It will
still open, but its windows won;t
be visible on the screen. The
application icon in the Dock will
have the triangle, though, so
you know it's open and you can
access it at any time.
-
It doesn't work very well to
add Classic applications to the
Login Items.
______________________
Dock
shortcuts
-
To hide all but one program,
press Command+Option and
click on its Dock icon and all
other applications and windows
hide instantly.
-
If you press Control
and click a Dock icon, it pops
up immediately without any delay.
-
Holding down the Option key when you resize the
Dock causes it to "snap" to only
the exact sizes in icon resources
for Mac OS X. The story is that
since the icons don't need to
be rescaled and redrawn on the
fly, you're supposed to see some
performance improvement on some
systems.
______________________
How
much RAM are you using in OS X?
______________________
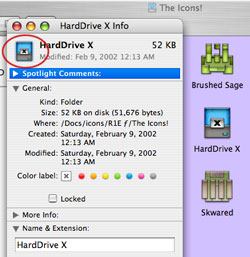
You
can copy and paste icons to custom
identify different document folders
or other resources in the Dock.
-
Show info on the item
you want to copy from, then select
the icon and copy (Ctrl+C).
Show info on the destination
document, select the icon, then
paste (Ctrl+V).
______________________
Mac
OS X 10.2 introduces features for
taking screen captures, also known
as screens shots.
AppleCare
Knowledge Base article 107071:
As in earlier versions of Mac
OS X, the Command-Shift-4
key combination allows you to
capture a selection of your screen
using a cross-hair mouse pointer.
To cancel the capture, press the
Esc key.
Additional features for version
10.2 include:
-
Hold down the Control key
along with Command-Shift-4
or Command-Shift-3
to capture to the clipboard instead
of to a file.
-
Press the Space bar along
with Command-Shift-4 the
crosshairs icon turns into a camera.
Move the camera over your windows
and the system highlights them,
indicating that the highlighted
item will be the only area of
the screen captured. To capture
that area, click the mouse
on the item.
______________________
Shutting
down ASAP
If you own a PowerBook G4
or iBook, you've no doubt
used the power button to quickly
display the dialog that lets you
shut down, restart, or put your
Mac to sleep. But don't feel slighted
if you own a desktop Mac. As Scott
Kelby points out in his book,
"Mac OS X Killer Tips,"
a similar trick involving the
Eject key (the upper-right key
on the keypad normally used to
eject disks from the optical drive)
works just as handily:
- "Simply press Control-Eject
and you get the same Shutdown
dialog. By the way, once the dialog
appears, you don't actually have
to use the mouse: Typing R(estart),
S(leep), or C(ancel)
works the same as clicking that
button. It's mega quick."
______________________ Want
to create your own screensaver from
your personal photos?
In OS X it is easy as drag
and drop...
-
Navigate to /Library/Image
Capture/Scripts/. You will
find a script called Build
Slide Show. Just drag the
images you want to be in your
Screensaver to the application
icon and drop them. The application
will create the configuration
file for the screensaver and place
it in the Users/your-computers-name/Library/Screen
Savers folder. By default,
the program will name your screensaver
RecentPhotos.slideSaver.
If you want to create another
you will have to rename your first
file because the application will
automatically overwrite the file.
Mac
OS X has multiple Fonts folders. Where
you install a font determines when
and who can use it.
______________________
Assigning
file types to open in certain applications.
Select the file you want to open (don't double click.)
Then up in the main menu click on File > Open
With then choose
Other...
You will get a dialog box to choose
the application you want. Also in the Dialog box is a small
check box below
your choices that says "Always Open With". Check
this.
Back to Top^
|

